This guide will walk through how to build a Homekit enabled Thermostat using a Raspberry Pi 3. You can use other Raspberry Pi models but if you do the parts listed below and some of the steps might vary but concept should be the same. Also do this at your own risk as the thermostat wires carry 24V DC or in rare cases 110V to 220V AC.
We will first start by understanding how a thermostat works so we have an understanding of what our Raspberry Pi needs to do to make this work. Next we will learn about the parts we need for this project and how to assemble it. Finally we will learn how to install and configure the required software to be able to use it with Apple’s Homekit. So lets get started.
How a Thermostat Works
Thermostat work by shorting or connecting the Power wire (R or Rc or Rh) wire to the wire for Heating (W), Cooling (Y) or Fan (G) that is connected to the Thermostat.
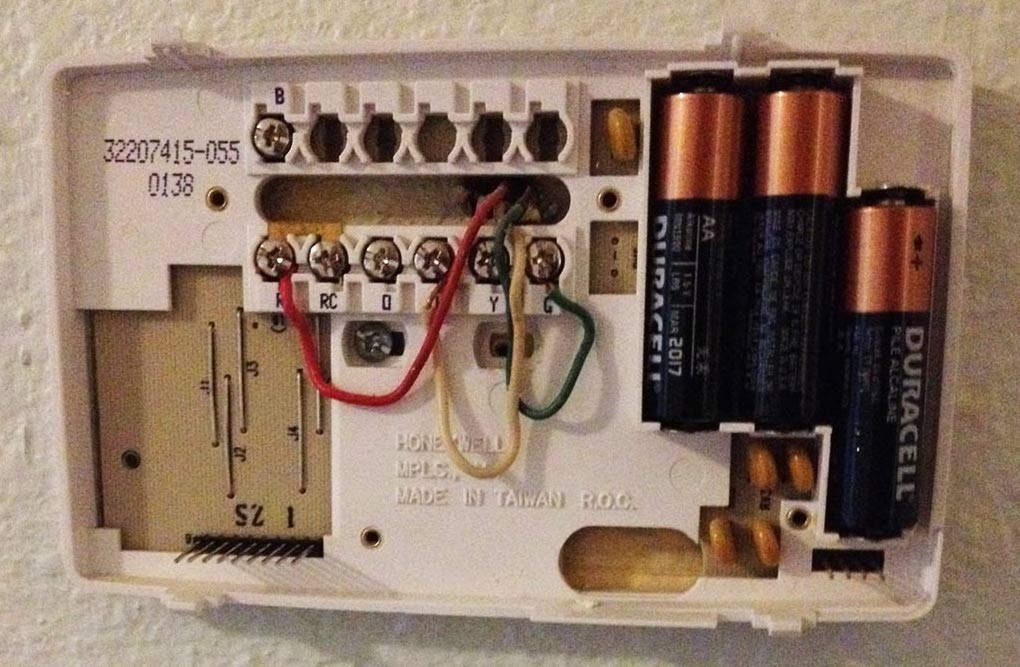
- Fan - To turn ON the fan only you need to short or connect Power wire (R) to the Green Wire (G). If you disconnect the R and the G wire then Fan will stop immediately.
- Heating - To turn ON Heat you need to short or connect Power wire (R) to the White wire (W). This will turn on the furnace and after about a minute turn on the fan so that the heat is circulated. Disconnecting the R and W wire will turn OFF the heat but the fan may keep blowing for about a minute to push out all of the heat before turning off completely.
- Cooling - To turn ON Cooling/AC you need to short or connect the Power wire (R) to the Yellow wire (Y). This will turn on the compressor and start the fan. Disconnecting the R and Y wire will turn OFF the cooling but the fan may keep blowing for about a minute to push out all of the cool air before turning off completely.
Having a little knowledge about how this works, we can easily make a thermostat using the rules mentioned above to turn on and off fan, heat and cooling. To connect or short wires we will need a switch which is called a Relay that basically connects when the relay switch is turned ON and disconnects the wires when the relay switch is turned OFF.
We will use Raspberry Pi along with the relay board to turn these switches on and off at appropriate times. For example when heat mode is ON and the current temperature is below the desired temperature then we need to turn the relay switch on that connects the power wire (R) to white wire (W). When the heat mode is ON and current temperature goes above the desired temperature then we need to turn the relay switch off so that it disconnects the power wire (R) to white wire (W).
Homekit and Homebridge
To make our thermostat work with Siri and the Home app we need to run a Homekit server on our Raspberry Pi that broadcasts to the network that this is a Thermostat accessory. Thanks for Homebridge it is easy to implement your own homekit server on a Raspberry Pi by simply installing homebridge as a node module and installing any homebridge accessories plugins as well.
In our case we would need to install the homebridge-pi-thermostat plugin to make our Raspberry Pi be known a smart Thermostat accessory to the Home app on iOS. This homebridge-pi-thermostat plugin implements the logic to turn ON and OFF heating and cooling system based on the desired temperature and mode set via the Home app in iOS. This plugin is also incharge of reading the current temperature coming from the DHT22 temperature sensor attached to the Raspberry Pi and based on temperature change it will either start or stop the heating/cooling system.
Part List
To make your own Homekit enabled Thermostat you will need these parts. For this guide we are using Raspberry Pi 3:
- Raspberry Pi 3 - https://a.co/hC1BX7C
- 8GB+ Micro SD Card - https://a.co/df7Z1Hy
- 5V Micro USB Adapter - https://a.co/j9QBM2Q
- 3 Channel Relay Board - https://a.co/7Qw3WIG
- DHT22 Temperature and Humidity Sensor with Jumper cable - https://a.co/ao5nXKV
- Wires - https://a.co/2DU7PJX
- Paper or cardboard case to enclose everything
Install Raspbian on Micro SD Card
For this project use Raspbian Stretch Lite image which you can download from the official Raspberry Pi website.
Once the Raspbian OS image is downloaded, copy it on the Micro SD card using Etcher or command line if you prefer.
Enable SSH
Once the OS is copied, mount the Micro SD card and create an empty file inside of the /boot drive of the Micro SD Card. On macOS to create the ssh file run the following command.
cd /Volumes/boot && touch ssh
Configure Wifi
To automatically connect the Raspberry Pi to your home Wifi on the initial boot up, create a wpa_supplicant.conf inside of the /boot drive. Enter the credentials to your Wifi in this file by copy pasting the contents below and replacing it with your Wifi name and password.
ctrl_interface=DIR=/var/run/wpa_supplicant GROUP=netdev
update_config=1
country=US

network={
	ssid="WIFINAME"
	psk="PASSWORD"
	key_mgmt=WPA-PSK
}
We are done with imaging our Micro SD card now. On the first boot it will connect to your home’s Wifi and we can ssh into the Raspberry Pi for later homebridge installation.
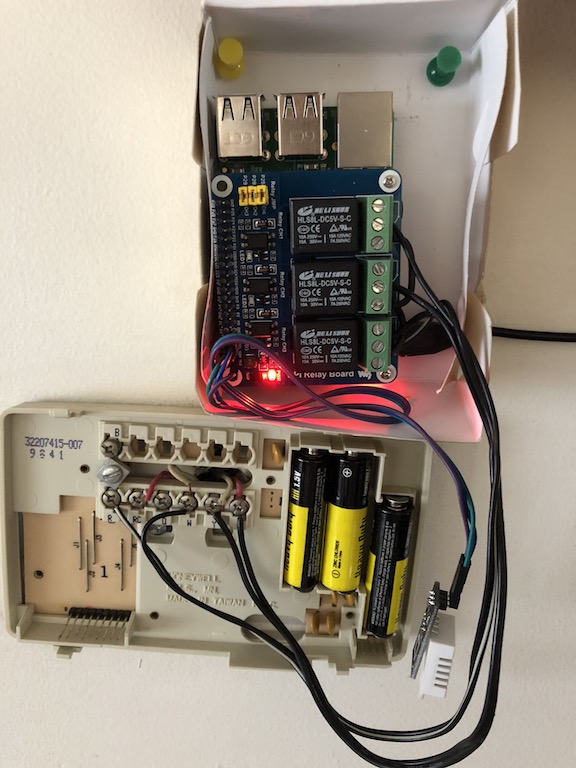
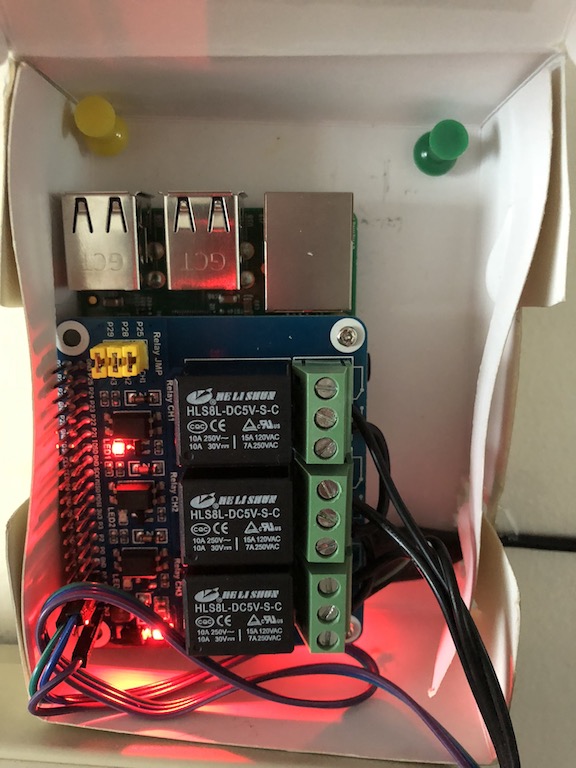
Hardware Assembly
- Insert the Micro SD Card into the Raspberry Pi.
- Connect the 3 channel Relay board Hat with its support to the Raspberry Pi.
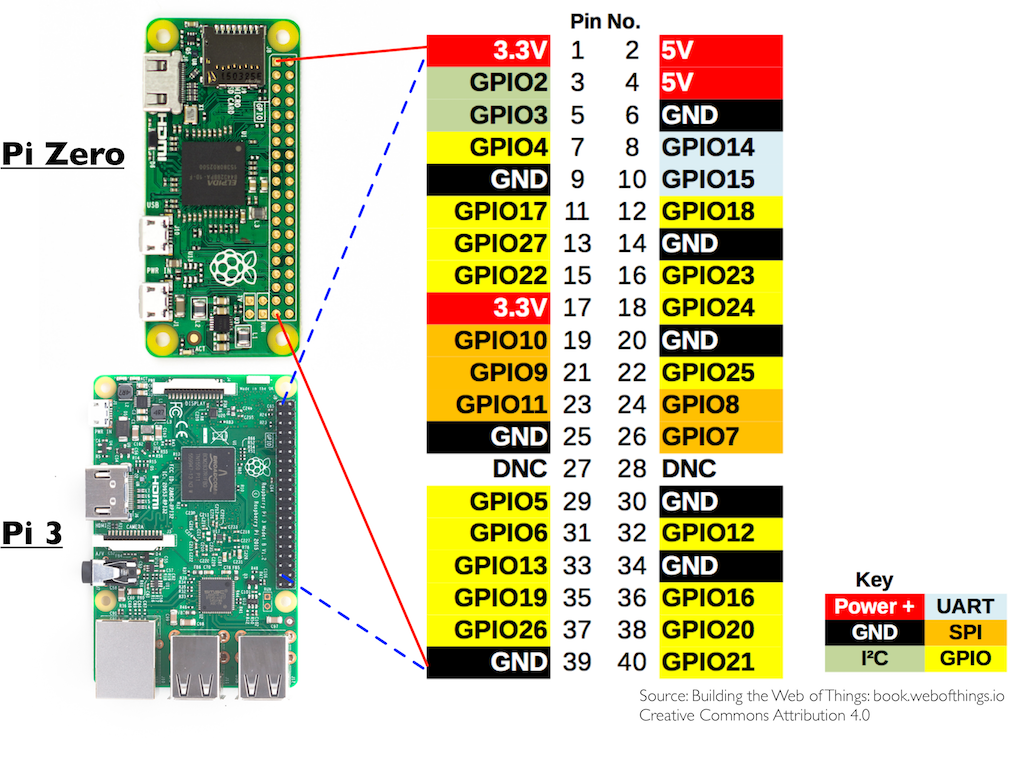
- Connect the DHT22 Temperature/Humidity Sensor to the Raspberry Pi. Insert the Positive (+) end via the jumper cable to the 3V Pin on the GPIO pins of the relay board. Connect the Negative (-) end via the jumper cable to the Ground (GND) Pin and Connecting the Data end via the jumper cable to the GPIO Pin 4. The pin number might be different on the relay board.
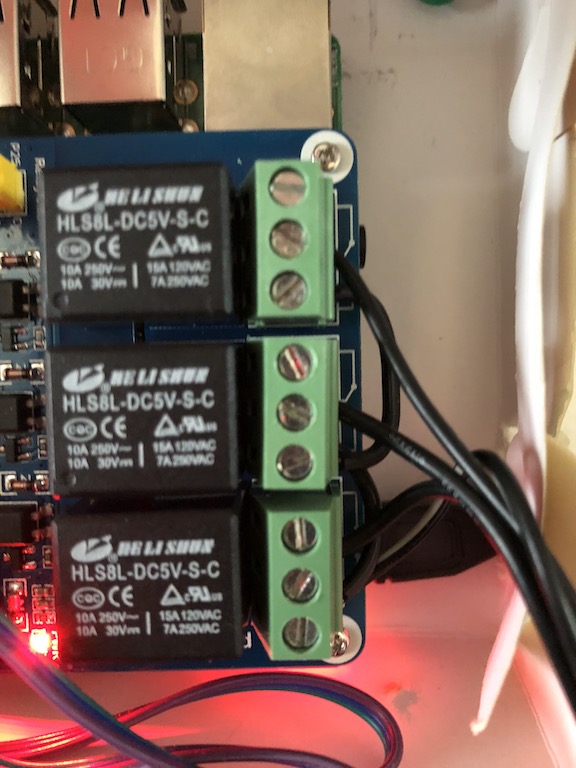
- Now moving on to the wiring. Cut two small pieces of wire. Insert one end of the first wire into the Normally Open (NO) terminal of Relay 1 and insert the other end of the first wire to the Normally Open (NO) terminal of Relay 2. Also insert one end of the second wire into the Normally Open (NO) terminal of Relay 2 and insert the other end of the second end to the Normally Open (NO) terminal of Realy 3. This connection will allow us to wire only one of the Normally Open (NO) to the R wire and all of them will be the positive 24V power connection.
- Now we need to cut 4 more wires to connect the four terminal (R, W, Y, G) from the Thermostat to the terminals on the relay board.

- Connect first wire to the R terminal of the thermostat to any of the NO terminal on the relay board.
- Next connect a wire between the G and the Common (center) terminal of Relay 1.
- Next connect a wire between the Y and the Common terminal of Relay 2.
- Next connect a wire between the W and the Common terminal of Relay 3.
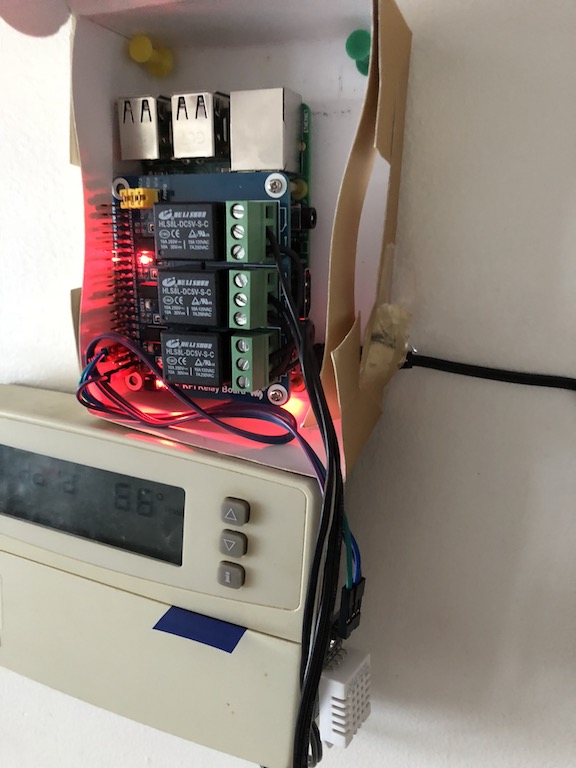
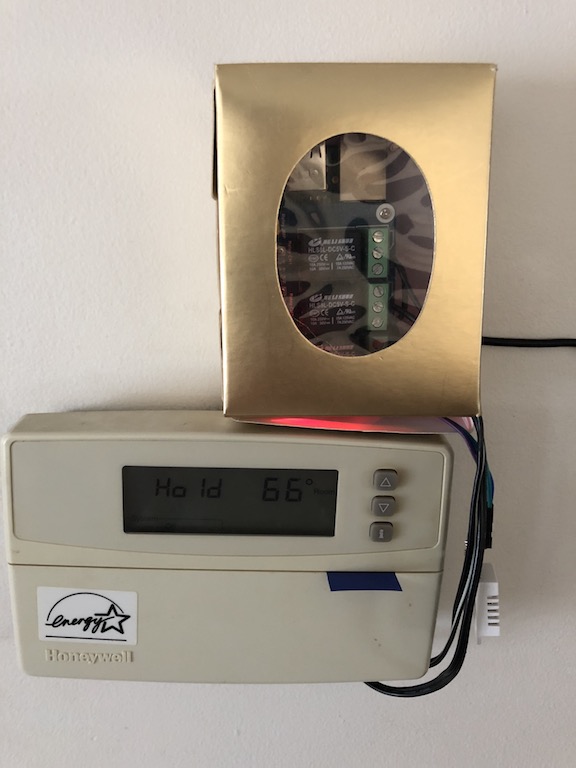
- Now we are done with the wiring so enclose everything in a box and power it up using the Micro USB power adapter.
Setting up Homebridge
SSH into the Raspberry Pi after powering up the raspberry pi. To ssh run the following command in the Terminal
ssh pi@raspberrypi.local
The password will be raspberry by default. You can change it if you want using the passwd command.
Now install nodejs and few other dependencies on your Raspberry Pi using the following command:
curl -sL https://deb.nodesource.com/setup_8.x | sudo -E bash - && sudo apt-get install -y nodejs libavahi-compat-libdnssd-dev
We also need to install BCM2835 library by running the commands below:
wget http://www.airspayce.com/mikem/bcm2835/bcm2835-1.52.tar.gz && tar zxvf bcm2835-1.52.tar.gz && cd bcm2835-1.52 && ./configure && make && sudo make check && sudo make install
Once we have nodejs and other dependencies installed, we can install homebridge and the homebridge-pi-thermostat plugin as a global npm node module using this command.
sudo npm install -g --unsafe-perm homebridge homebridge-pi-thermostat
Next create the homebridge configuration file ~/.homebridge/config.json and copy the following configuration. Modify the configuration below if the wiring is different.
{
  "bridge": {
    "name": "Homebridge",
    "username": "CC:22:3D:E3:CE:30",
    "port": 51826,
    "pin": "031-45-154"
  },
  "description": "",
  "accessories": [
    {
      "accessory": "Thermostat",
      "name": "Pi Thermostat",
      "fanRelayPin": 26,
      "heatRelayPin": 21,
      "coolRelayPin": 20,
      "temperatureSensorPin": 4,
      "minimumOnOffTime": 120000,
      "blowerTurnOffTime": 80000,
      "startDelay": 10000,
      "temperatureCheckInterval": 10000
    }
  ],
  "platforms": []
}
Relay 1 pin is pin number 26 which we connected to G wire which is for fan. Relay 2 pin is pin number 20 which we connected to Y wire which is for cooling. Relay 3 pin is pin number 21 which we connected to W wire which is for heating.
We also connected the DHT22 temperature sensor to pin number 4.
The other configuration for minimum on off time and blower turn off time can be changed as needed and is in milliseconds. The minimumOnOffTime is there as a safety check to protect your heating and cooling system from turning on and off quickly.
Starting it up
To start it all up run the following command in the terminal. If everything is installed correctly homebridge will print a QR Code.
homebridge
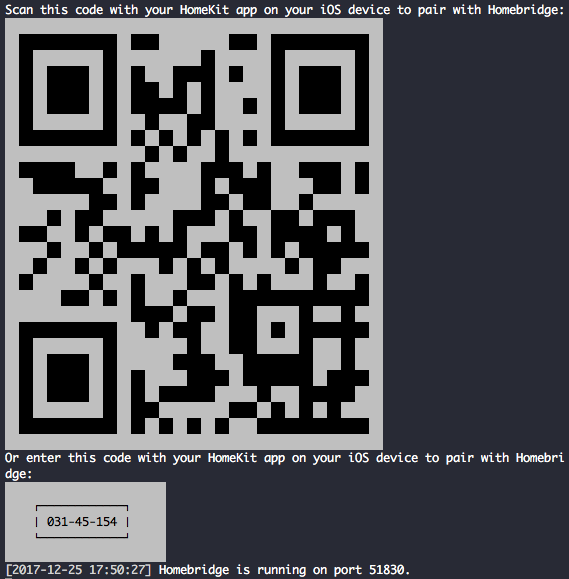
Now open the Home app on your iPhone and iPad and add an accessory and scan the QR code. Great now you are done and have a Homekit thermostat that can turn on and off your heating and cooling system based.


Additional Functionality
Homekit is great and lets you control accessories from your iOS devices and even when you are outside your home network if you have a home hub setup via your Apple TV or iPad. Here are some ideas where you can expand upon this.
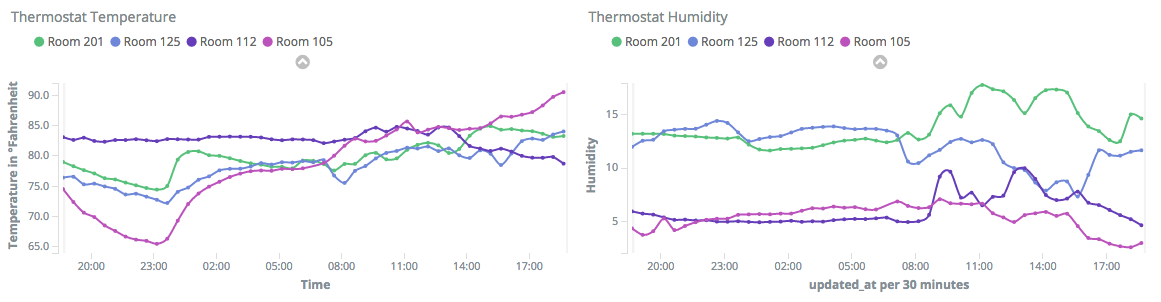
Since Homekit does not allow you to see historical data for a Homekit enabled accessory we would need a way to record the temperature data along with the start and stop times of our heating or cooling system so we can see how much energy we have consumed. For this we can use an elasticsearch index and graph the temperature reading data using Kibana. We can even store the run time of our system and generate a total or an average per day using Kibana as well.
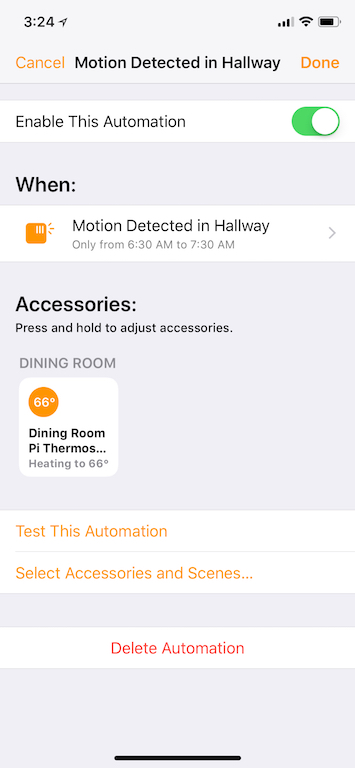
Another extension to this thermostat is to add a motion sensor so that you can create an Automation using the Home app to turn on the heating/cooling only if there is motion detected otherwise turn it off if there is no motion. You can even write your custom logic similar to Nest to figure out ideal time to turn on and off heating/cooling based on the motion and outside temperature.
Resources
- Homebridge Pi Thermostat Plugin - https://github.com/ankurp/homebridge-pi-thermostat